 |
| About Bioline | All Journals | Testimonials | Membership | News |
|
||||||
|
||||||
Iranian Journal of Pediatrics, Vol. 20, No. 2, Apri l-June, 2011, pp. 129-138 Unilateral Cleft Lip and Nasal Repair: Techniques and Principles John G. Meara1, MD, DMD, MBA; Brian T. Andrews1, MD, MA; Emily B. Ridgway1, MD; Mohammad-Ali Raisolsadat‡2, MD, and Mehran Hiradfar2, MD
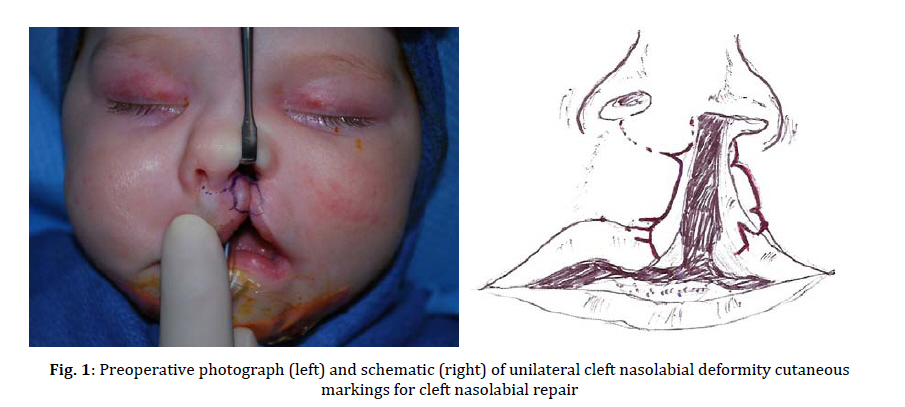
Received: Jun 16, 2010; Accepted: Jan 12, 2011 Code Number: pe11025 Abstract The Mashhad University of Medical Sciences and the Sheikh Hospital in Mashhad sponsored a Cleft Lip and Palate Workshop 30 April – 1 May 2009. During the Workshop, 6 surgical cases were performed and televised live to the audience attending the conference. Two of those cases were unilateral cleft lip repairs. The surgical technique used to repair these patients by the primary author (JGM) is a hybrid technique. It has evolved over the last decade as a result of prior surgical literature as well as first hand observation of various surgical colleagues. The following manuscript describes the surgical technique used at the Cleft Workshop in a step-wise or atlas-like fashion. The technique portion of the paper describes the repair of the unilateral cleft lip and nasal deformity in roughly the order the first author typically performs the procedure. More importantly, the final section of the paper details the principles that form the foundation for the techniques described. Key Words: Cleft Lip; Cleft Nasal Repair; Unilateral Cleft Lip; Unilateral Cleft Techniques Introduction Historical reference to the cleft lip deformity dates back to the Greek physician Hippocrates who referenced the presence of this condition but not its repair in his writings. Around 150 A.D., the Roman physician Galen used the term “lagocheilos” to describe a similar condition. Chinese physicians are credited as the first to repair the cleft lip deformity around 390 A.D. They performed their repair by simply bringing the cleft segments together towards the midline and securing them with silk ties and resin. Around a thousand years later, the Flemish physician Yperman (1295-1350), performed the first modern cleft lip repair, or cheiloplasty. He used a simple repair by incising the cleft margins, pulling the opposing raw surfaces together and securing them with sutures. Today, there are many techniques to repair the unilateral cleft lip deformity. Despite the numerous eponymous techniques, all are derived from three basic “methods” for unilateral cleft lip repair: the straight-line technique, the triangular flap technique, and the rotation-advancement technique. Each has its advantages and limitations, therefore no individual technique has gained universal acceptance. A surgeon’s decision to use a certain repair is most often dependent on his or her training and exposure to the various techniques available[1]. The earliest publications on cleft lip repair were modifications of the straight-line repair as described by Rose and Thompson[2,3]. This method is conceptually the simplest method to understand and perform. The basic concept of this repair technique involves the use of angled incisions made at the opposing cleft margins. The lateral cleft segment is then mobilized to join the medial segment creating a philtral column where the scar lies. Limitations of this technique are the creation of a short upper lip with a notch at the vermillion-cutaneous junction. This is a common complication of a poorly performed cleft lip repair. Furthermore, nasal symmetry is often hard to achieve and is often left for a secondary repair. Triangular flap methods, although once popular, are less commonly used in modern cheiloplasty. Several surgeons such as Tennison, Skoog, and Randall have popularized variations of this technique[4,5,6]. These repairs recruit tissue from the lateral cleft element by creating a “triangular flap” and inserting this flap into the medial segment. This is a unilimb Z-plasty technique. This method recognizes the common problem of a short lip typical of straight-line closure methods and avoids this complication by elongating the medial segment. It elongates the medial segment by the base dimension of the triangular flap inserted into it. Typically, the triangular flap is placed high in the philtral column just under the columellar-labial junction. The downfall of this technique is it creates an unnatural scar that crosses the philtrum in a highly visible portion of the lip. In 1957, Millard published his preliminary results using a novel method that he referred to as the rotation-advancement method[7]. Since that time, his technique has undergone numerous modifications but still remains the most commonly used technique for unilateral cleft lip repair[8]. This technique involves the rotation of the medial cleft element, increasing its length and advancement of the lateral cleft element into the back cut near the columellar-labial junction. In his writings, Millard emphasized the importance of reestablishing symmetry to the lip and nose at the time of the initial lip repair[9]. He did this by establishing normative measurements between certain anatomic landmarks and emphasized adherence to these measurements. However, these landmarks are often arbitrary, and require considerable time and experience to master. Malposition of these landmarks will lead to an asymmetric lip and an unsatisfactory aesthetic result. In 1995, Fisher published his technique for unilateral cleft lip repair[10]. This procedure incorporates basic concepts from each of the methods previously described and adheres to the model of establishing symmetry of the lip and nose. The primary author of this paper (JGM) has further customized the Millard, Skoog and Fisher techniques and presents his experience with the surgical management of the unilateral cleft lip and nasal deformity. This paper describes his modifications and discusses the surgical principles utilized in the unilateral cleft lip repair. Methods of Surgical Technique Surgical Planning (Skin markings and local infiltration)
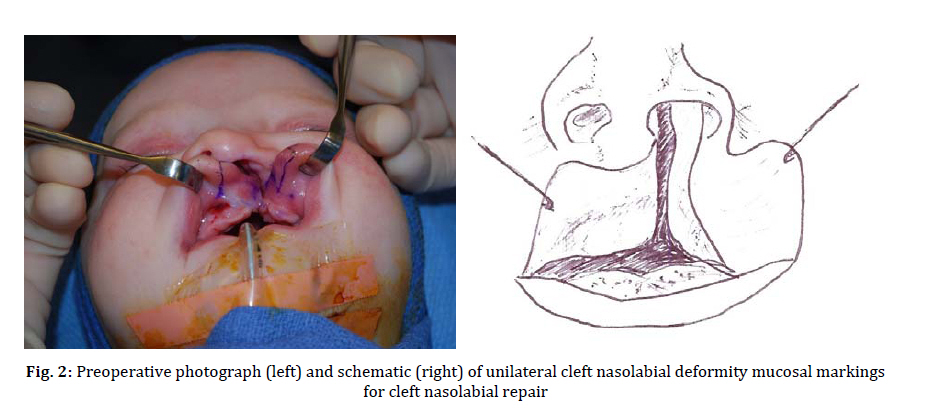
Skin incisions Incisions are then made with a #15 blade scalpel along the medial skin markings first. The lateral incision is then performed creating three triangular flaps; 2 cutaneous and 1 in the dry vermilion. An incision is made in the labial sulcus several millimeters above the attached gingiva. Rarely, in very wide clefts, a 3-4 mm “releasing back cut” is made at ninety degrees to the distal aspect of the gingivobuccal incision. This allows for easier advancement of the lateral cleft element and helps establish an adequate gingivobuccal sulcus (Fig. 2). Muscle incisions and movement
Nasal repair
Additionally, half of the non-cleft side skin should be degloved to mobilize the contralateral genu. This allows proper restoration of the nasal tip anatomy.
Three-Layer Closure
Postoperative instructions
At this time the lip is assessed and the incision is cleaned. All chromic suture remnants remaining at this time are removed by rubbing with a cotton bud soaked in a saline/hydrogen peroxide mixture.
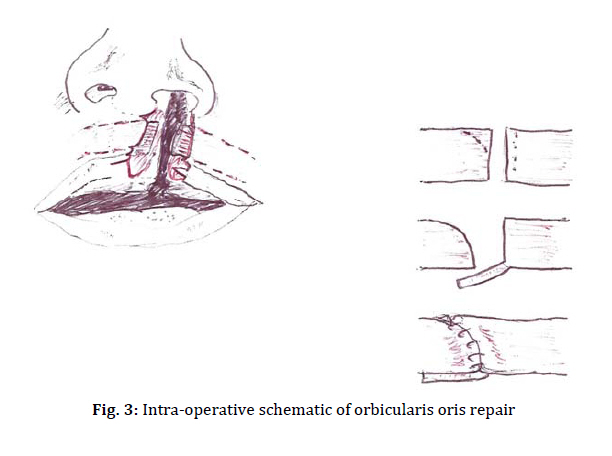
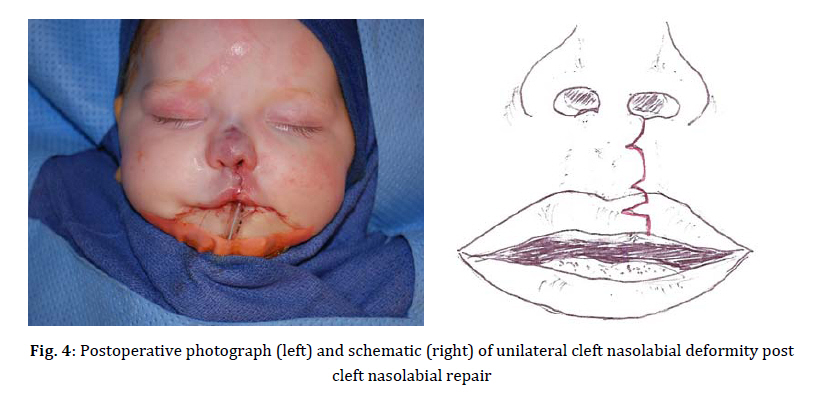
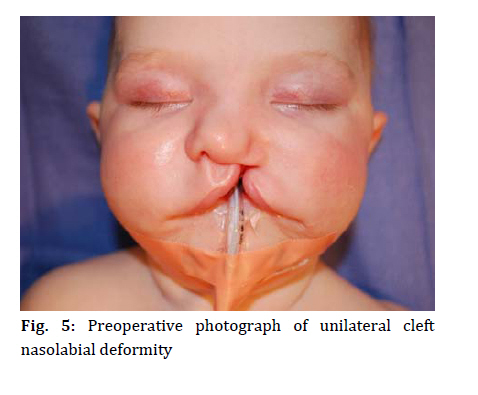
Discussion Understanding the normal lip and nasal anatomy is essential for any surgeon managing cleft lip deformities[11]. The anatomy of the upper lip is more complex than that of the lower lip. Its shape is often referred to as a “Cupid’s bow”. Millard popularized this terminology by demonstrating that each philtral column originated from a symmetric point several millimeters higher than that of the midline point[12]. Further adding to the complexity of the upper lip are the paramedian philtral columns and the midline dimple. The philtral columns are formed by the intersecting orbicularis oris fibers at the midline. They insert into the dermis of the adjacent side and create a depression at their midline desiccation. The “white roll of Gilles” located just above the vermillion-cutaneous junction is formed by the inferior portion of the orbicularis oris muscle, termed the pars marginalis. This structure inserts in the dermis forming a “rolled” skin prominence. The vermillion mucosa is composed of keratinizing epithelium (dry mucosa) below the vermillion-cutaneous junction, and non-keratinizing epithelium (wet mucosa) that extends into the labial sulcus. The “red line of Noordhoff” is the area where these structures coalesce. The median tubercle is the midline prominence of the mucosal portion of the lip often deficient in cleft lip patients. In the unilateral cleft lip, Cupid’s bow is displaced and the lip is short on the cleft side (Fig. 5). The orbicularis muscle inserts into the nasal base on the cleft side. The nose has a short columella with a depressed, flattened, malformed lower lateral cartilage and inferolaterally displaced alar base. The caudal septum is typically deviated away from the cleft side. Regardless of technique, an understanding of certain principles is necessary and should guide the surgeon through the correction of the cleft lip deformity[13]. The senior author believes in 8 principles for the repair of the unilateral cleft lip deformity: 1) Establish a symmetric, balanced Cupid’s bow 2) Construct a full median tubercle and adequate dry vermillion height 3) Construct a philtral column with the same shape and height as the philtral column on the non-cleft lip side 4) Construct a normal unscarred columella and establish a symmetric columellar-labial junction 5) Reorient and repair the orbicularis oris muscular sling 6) Create an adequate labial sulcus 7) Correct the cleft nasal alar deformity 8) Atraumatic, nonlinear skin closure. It is important to realize that several of these principles overlap one another. Pursuing these principles will improve the aesthetic outcomes of any cleft lip repair. 1) Establish a symmetric Cupid’s bow and white roll: Caliper measurements are often necessary to establish the symmetric landmarks of Cupid’s bow. Measurements based on the non-cleft side are used to establish these points prior to any skin incision. The point of emphasis is on the presurgical markings and establishing these points by subcutaneous tattooing. Tattooed points should include the low point of Cupid’s bow and Cupid’s peak bilaterally. Cupid’s peak on the cleft side needs to have two corresponding marks, one on the medial cleft segment and one on the lateral cleft segment. These points will be united and must be aligned to form one single, contiguous white roll at Cupid’s peak that is symmetric with the non-cleft side. With the infiltration of local anesthestic prior to incision these landmarks become distorted. Therefore tattooing their location with Methylene Blue or Brilliant Green is important prior to infiltration. Care should also be made at the time of skin incision not to excise the tattooed dots. One way to avoid this is to place the tattoos just outside the lines drawn on the lip so that the incisons will not violate the tattoo marks. In wide clefts, Cupid’s peak is often located more lateral than typically appreciated and may leave a discrepancy in the measurements between Cupid’s peak and the oral commissure laterally. This measurement is typically made under tension on the cleft side and at rest on the non-cleft side to account for this discrepancy and a discrepancy in this measurement is more desirable than a short upper lip. At the end of the repair the following measurements should be nearly symmetric: low point of Cupid’s bow to Cupid’s peak bilaterally, Cupid’s peak to the oral commissure bilaterally, and nasal ala to Cupid’s peak bilaterally (Fig. 4). A short upper lip is the stigmata of a poorly done unilateral cleft lip repair. In this deformity, the medial lip incision is too short and a notch is created at the vermillion-cutaneous junction displacing the Cupid’s peak superiorly. When this happens the nasal ala to Cupid’s peak measurement is asymmetric. 2) Construct a full median tubercle and adequate dry vermillion height: Deficient bulk of the median tubercle is a common problem following unilateral cleft lip repair as is inadequate height of the dry vermillion. Several technique modifications are employed to avoid these complications. First is the use of a pedicled flap of orbicularis muscle from the lateral lip element. This tissue is inserted into a tunnel made in the inferior most portion of the medial lip element. Consideration of the abnormal anatomy of the cleft lip is important. Prior to surgical intervention, the medial border of the lateral cleft orbicularis musculature follows the margins of the cleft and is oriented toward the nasal sill. During the lip repair the muscle is dissected free of the nasal sill and rotated inferomedially. When this is done the lateral muscle element is redundant and creates a size mismatch with the medial segment musculature. The rotation of the medial lip element muscle helps to address this mismatch. In addition the creation of a distally based pedicled flap of orbicularis muscle also helps to minimize this length discrepancy. This flap is rotated and used to augment the median tubercle by its insertion into the tunnel created in the medial lip element. The primary purpose of this muscle flap is to create bulk of the median tubercle, however, it also provides a stable foundation under the vermilion closure and mitigates against the tendency for a whistle deformity due to circumferential scar contracture of the vermilion closure. A second inadequacy pertains to the height of the medial lip element dry vermilion border. When left unrepaired it creates a discrepancy at the site of the vermillion repair and is highly visible. This problem is addressed by placing a triangular flap from the lateral lip element into an incision at the wet/dry junction as described by Noordoff 14. This is a unilimb Z-plasty technique of scar elongation. Additionally, this maneuver breaks up the closure of the vermilion making the scar less noticeable. 3) Construct a philtral column with the same shape and height as the philtral column on the non-cleft lip side: Establishing adequate height of the medial lip segment is important to establish a symmetric Cupid’s bow as discussed in the 1st principle. Inadequate lip height is the hallmark shortcoming of most straight-line methods of lip repair and is the primary reason these techniques have been abandoned for other methods. The rotation-advancement method utilizes a curvilinear incision that extends onto the columella to gain philtral length. Even with this technique, it is often necessary to incorporate a Z-plasty technique just above the vermillion cutaneous junction to achieve a symmetric Cupid’s bow 13. Our technique is a modification of the Skoog, Millard and Fisher technique in that a triangular flap from the lateral lip element is used just below the columella creating a minor degree of rotation-advancement, and just above the white roll to elongate the philtral column. Two releasing “V cuts” are made in the medial cutaneous segment incision and allow for the placement of two cutaneous triangular flaps from the lateral lip element. Incorporation of this skin from the lateral segment increases the length of the medial incision and establishes symmetric lip height. The advantage of using two triangular flaps is the avoidance of an elongated scar across the philtrum. When present, this scar is highly visible and aesthetically undesirable as seen in the Randall and Tennison repairs[4,6]. 4) Construct a normal unscarred columella and establish a symmetric columellar-labial junction: To appreciate this concept one must study the normal relationship between the columella and its surrounding structures. At the base of the columella the skin gently drapes in an apron-like fashion anteriorly on to the philtrum and laterally over both medial crura footplates. This region is notoriously difficult to reconstruct. Rotation-advancement methods utilize a C-flap and a high philtral or columellar back cut to construct this area on the cleft side. However, the C-flap and columellar backcut leave a scar that distorts the natural nasolabial junction and rarely create a natural appearing footplate region. Fisher was unsatisfied with the repair of this region using other previously described methods[10]. Using his own modifications, he describes what he terms “a back cut” design that does not violate the nasolabial angle region. He also modified the nature, size and use of the traditional C-flap. Incorporating this design creates a more natural skin “apron” in the columellar and footplate region on the cleft side. It also places the nasal floor closure in a roughly symmetric position in relation to where the ala meets the footplate skin on the non-cleft side. 5) Re-orient and repair the orbicularis oris muscular sling: Along the medial lip element the orbicularis muscle is dissected and prepared such that it parallels the skin curvature due to resection of 1-2 mm from the margin of the upper aspect of the medial element muscle that is of increasing width as the anterior nasal spine (ANS) is approached. Operationally, the initial maneuver is begun at the ANS region with a curved iris scissor and approximately 2 mm of muscle is resected. This resection of medial lip element muscle is then tapered as the mid portion of the muscle is approached; no muscle is resected from the pars marginalis of the medial lip element orbicularis. At the time of lateral segment mobilization, the orbicularis muscle is dissected free from the overlying skin and underlying mucosa. The first muscle suture in the pars marginalis region unites the medial and later lip element muscle just proximal to the fulcrum point of the pedicled muscle flap. This suture is cut long and a hemostat is used to pull its tail inferiorly. This is a technique taught to the senior author by Luis Bermudez, MD and is important for adequate muscle rotation[15]. Furthermore, it provides a stable foundation for the length of the skin closure. The muscle is then repaired with a slight amount of tension, elongating the line of the muscle closure providing a stable lengthened foundation to support the dermal closure (Fig. 3). 6) Create an adequate labial sulcus: This is created by incising just above the fixed gingiva in the labial sulcus of the lateral cleft segment. On the medial lip element mucosa a rotation incision is made that parallels the geometry of the muscle to allow for lengthening of the medial lip element mucosa. The advanced lateral lip element mucosa is placed into the back cut of the medial lip element mucosa in the labial sulcus. The midline frenulum is incised to achieve the benefit of the rotation incision. 7) Correct the nasal alar deformity: Historically, the amount of nasal dissection performed at the time of primary lip repair has been limited because of concerns for disturbance of nasal and midface growth. However, extensive nasal dissection has been routinely performed at our center and described by many others with no untoward effects. Addressing the cleft nasal deformity at the time of lip repair often results in fewer nasal revision procedures during adolescence13. The technique described in this paper involves degloving the nasal skin envelope primarily via a lateral alar approach. With experience, a midline columellar approach can also be utilized but is more difficult to perform. When incorporated, it must not violate the “apron” of skin located at the columellar-labial junction. The nasal skin is extensively degloved. The skin overlying the non-cleft lower lateral cartilage is included in the dissection so that the 2 lower lateral cartilage genua may be moved freely and reconstituted to create a normal dome appearance. The nasal layers are then reapproximated using through and through “mattress” sutures beginning in the lower alar region and curving up along the cranial margin of the upper crus toward the tip region. At least one suture is placed in the region of the genu that fixes the genu together, with all knots placed intranasally. It is also important to place a hemi-alar cinch suture from the base of the cleft side alar base to the fibrofatty tissue at the base of the columella in order to properly position the ala, provide the proper curvature of the lower lateral portion of the alar skin as it approaches the nostril floor and also to help vertically position the columella by gently pulling the base of the columella toward the cleft side. It should also be noted that Dr. Mulliken advocates dissecting and freeing the caudal margin of the septum and repositioning it in the midline over the maxillary crest[13]. This maneuver can be adopted by the experienced cleft surgeon. 8) Atraumatic, nonlinear closure to minimize scarring: This is accomplished by combining several previously discussed principles with a few new concepts. Linear scars on the face are much more noticeable than broken-line closures. The utilization of the 2 small cutaneous triangular flaps from the lateral element placed into the medial element not only improves lip height but serves to break up the linear scar present at the philtral column. Second, the scar is naturally located at a junction of an anatomic subunit, the philtral column, and is an ideal location for scar placement. The first author has placed the triangle from the lateral lip element both above and directly into the white roll in the past. Presently he prefers placement approximately 1mm above this structure. However, Dr. Mulliken prefers placing his flap right at the white roll[13]. This point is a technique issue and is less important than the principle of breaking up the skin closure in 2 locations. The other component of the principle described in this section deals with atraumatic handling of the skin and dermis. Grasping the skin and dermis with forceps should be avoided. The surgeon can grasp the undersurface of the dermis or use a skin hook as needed. Grasping the skin surface with forceps punctures and crushes the skin and dermis and is unnecessary. The skin closure is achieved with buried interrupted sutures and few or no transcutaneous sutures are needed. If necessary, sutures placed transcutaneously should be 7-0 chromic. Dermabond is used as the final layer of closure instead of skin sutures. When using Dermabond or any cyanoacrylate skin glue, ointments should not be placed on the incision site postoperatively. The skin glue will begin to peel off in 5-7 days and parents are instructed to begin bathing and washing the lip 3 days after surgery to promote the removal of the glue. Parents are told that by 7 days the glue should be completely removed using soap and water. Acknowledgment The content of this manuscript was presented at the Cleft Lip and Palate Workshop at the Shiekh Hospital in Mashhad Iran 30 April – 1 May 2009. References
Copyright 2011 - Iran Journal of Pediatrics |
